![Ramp_Logo_Saphire-Nov-06-2023-11-33-51-7748-PM.png]](https://support.ramprfid.com/hs-fs/hubfs/Ramp_Logo_Saphire-Nov-06-2023-11-33-51-7748-PM.png?height=39&name=Ramp_Logo_Saphire-Nov-06-2023-11-33-51-7748-PM.png)
Ramp Print communicates with the printer through the SATO printer driver, and that driver is tied to the connection type it was installed with (USB port or network port). If you change how the printer is connected, the existing driver will no longer work. You'll need to remove it and install a new one that matches the new connection.
This article covers switching in either direction.
Before You Begin
- You'll need permission to install and uninstall software on the computer.
- If you're switching to a network connection, you will need to reserve an IP address for the printer on your network. If you're not sure how to do this, contact your IT or Ramp Support.
- If you no longer have the SATO driver installer, download it here: SATO_8.4.0_20442
- This driver is only suitable for Windows 7 machines or newer, excluding Windows on Arm.
Switching the Connection
1. Change the physical connection
- Switching to network: Connect an Ethernet cable from the printer to your network and disconnect the USB cable.
- Switching to USB: Connect a USB cable between the printer and the computer and disconnect the Ethernet cable.
2. Unselect the old printer in Ramp Print
- Log in to the Ramp Print application.
- Open Printer Settings and unselect the currently selected printer.
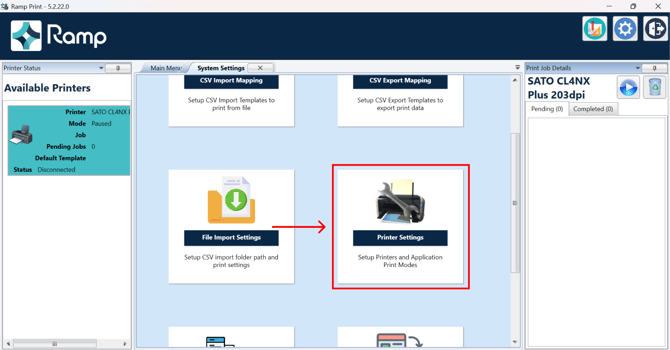
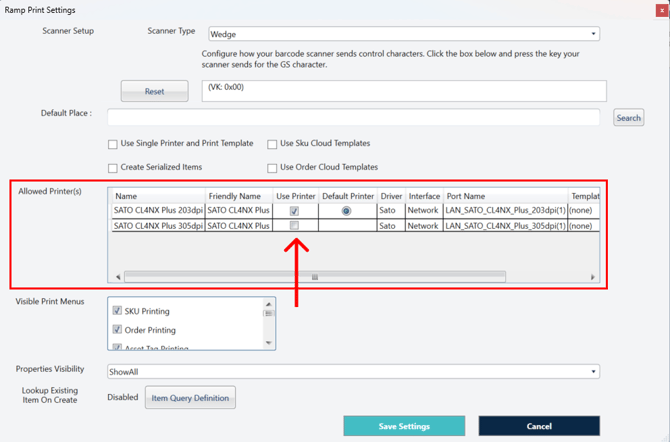
- Close the Ramp Print application.
3. Uninstall the old printer driver
- Unzip the SATO driver installer (download it above).
- Open the file named PrnInst.exe
- Click Uninstall Printer Drivers.
- Select the driver that you want to uninstall. Tick Remove unused ports.
- Follow the steps to uninstall the driver.
A files in use warning is common here and doesn't mean the uninstall has failed. The restart in the next step completes the removal.
4. Restart the computer
Restart the computer before installing anything new. This clears any files still in use from the old driver.
5. Install the new printer driver
Follow the steps under Installing Printer Drivers in the article Installing Ramp Print Software.
Select the port type that matches the way the printer is now connected.
6. Select the new printer in Ramp Print
- Log in to the Ramp Print application.
- Open Printer Settings and select the newly installed printer.
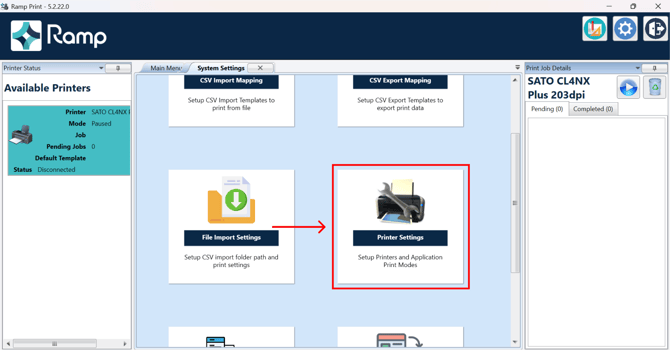
- Print a test label to confirm everything is working.
Things to Keep in Mind
- Always match the driver to the connection. A driver installed with a USB port won't work over the network, and the reverse is also true. If the printer shows as Disconnected after a switch, the most likely cause is a driver installed for the wrong port type.
- Don't skip the uninstall or the restart. Installing the new driver over the old one can leave duplicate or conflicting printers, which makes it unclear which one Ramp Print is using.
- Unselect the old printer before closing Ramp Print. This stops the application from trying to reconnect to a printer that no longer exists.
- Network connections depend on the IP address. If the printer's IP address changes later (for example, if it's assigned dynamically), Ramp Print will lose the connection. Ask your IT team to assign the printer a fixed IP address if possible.
- Switching back later means repeating the whole process.